
Adding tagging to my blog
Sunday, April 11, 2021
This blog is pretty bare bones starting from the Gatsby's blog starter. As I said before, I am using this as a bit of a learning tool/playground.
The first thing that came time mind to me was tagging posts, it's not new by any means and all the cool kids call it hashtagging today, but it's my first dive into modifying the system rather than just the layout and content.
Exposing the option to add tags takes just a few quick tweaks, let's look a little closer what we need to change:
The Content
In the starter kit all your blog posts are markdown files stored in content/blog/slug. So in the starter kit we have a blog post that has a slug of hello-world and a markdown file that contains the content of that post. Which starts out like this:
---
title: Hello World
date: "2015-05-01T22:12:03.284Z"
description: "Hello World"
---

This is my first post on my new fake blog! How exciting!

I'm sure I'll write a lot more interesting things in the future.
As you can see we already have a few data fields title, date, and description. It's as simple as adding a new field, and our tag data. Being that we're likely going to tag a post with more than 1 tag, it's probably safe to consider it an array of values like this
---
title: Hello World
date: "2015-05-01T22:12:03.284Z"
description: "Hello World"
tags: [boiler-plate, template]
---

This is my first post on my new fake blog! How exciting!

I'm sure I'll write a lot more interesting things in the future.
Now we've got boiler-plate, and template as tags on our blog post. But when you navigate to that article, nothing has changed, what gives?
Content Generator
Digging around you start to realize that gatsby-node is the magic behind converting your markdown to html pages. In the starter kit you'll see we're using createPages API. Quick review looks like get a template file to use, request data from graphql and then generate a page for each markdown file. Looking closer we see types defined below that match up to data in the markdown files.
type MarkdownRemark implements Node {
  frontmatter: Frontmatter
  fields: Fields
}
type Frontmatter {
  title: String
  description: String
  date: Date @dateformat
}
Remember our markdown file? We had title, date, and description, so this seems like where we'd want to add something to get our tag information from markdown to our template file (for actually showing the values).
The pattern here seems to be extending the Frontmatter with our additional data, so thats what we'll do.
type Frontmatter {
  title: String
  description: String
  date: Date @dateformat
  tags: [String]
}
With that in place, we can now query our tag data, you can try this out by looking at your graphql server locally, or just keep pushing forward.
query MyQuery {
  allMarkdownRemark {
    edges {
      node {
        id
        frontmatter {
          title
          description
          tags
        }
      }
    }
  }
}
Final Step - Update our view
We've got the content updated with our tags, and we've updated our transformation layer to be expose the tag data to the view. All that is left is to get that information pulled into the view and on the screen for the user.
We saw in the gatsby-node file that our blogs are using the template file templates/blog-post.js. Taking a look in that file we've got a page query at the bottom and the JSX to render our component on the top.
First let's get the data by updating the query, should be simple enough, right?
export const pageQuery = graphql`
  query BlogPostBySlug(
    $id: String!
    $previousPostId: String
    $nextPostId: String
  ) {
    site {
      siteMetadata {
        title
      }
    }
    markdownRemark(id: { eq: $id }) {
      id
      excerpt(pruneLength: 160)
      html
      frontmatter {
        title
        date(formatString: "MMMM DD, YYYY")
        description
      }
    }
    previous: markdownRemark(id: { eq: $previousPostId }) {
      fields {
        slug
      }
      frontmatter {
        title
      }
    }
    next: markdownRemark(id: { eq: $nextPostId }) {
      fields {
        slug
      }
      frontmatter {
        title
      }
    }
  }
We've got a few things in here using the markdownRemark type. We're really only interested in the item for article being shown which also happen sot have the additional fields date and description. So we probably can just add to that query by adding our new element tags, so it should look like this
    markdownRemark(id: { eq: $id }) {
      id
      excerpt(pruneLength: 160)
      html
      frontmatter {
        title
        date(formatString: "MMMM DD, YYYY")
        description
      }
    }
Our site was updated, rebuilt and refreshed, but we still don't see our tags. We still have one final step, actually updating the view to use the content. Remember the shape of our data, we added to the frontMatter, but also that's a good anchor to try and find how we render this information today.
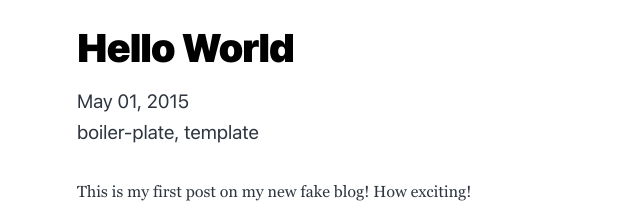
We've got a H1 tag that is showing the title from frontMatter, and we're getting the post date in a similar way.
<h1 itemProp="headline">{post.frontmatter.title}</h1>
          <p>{post.frontmatter.date}</p>
So let's get the tag data in there too, but remember our tags field is an array of strings, so we'll want to format them nicer by doing something like joining them together with a comma.
<h1 itemProp="headline">{post.frontmatter.title}</h1>
          <p>{post.frontmatter.date}</p>
          <p>{post.frontmatter.tags.join(", ")}</p>
Success
What's next?
Now that we've got the ability to add tags to our blog, it might be nice to give users the ability to find all posts related to that tag. Let's dive into that in a future post.